
This illustrated tutorial is based on a MCA Family Day activity I designed in 2019. Now you can make your own crankies at home!
UPDATE: There is a simplified version of this tutorial on the MCA’s ART AT HOME blog.
Materials:
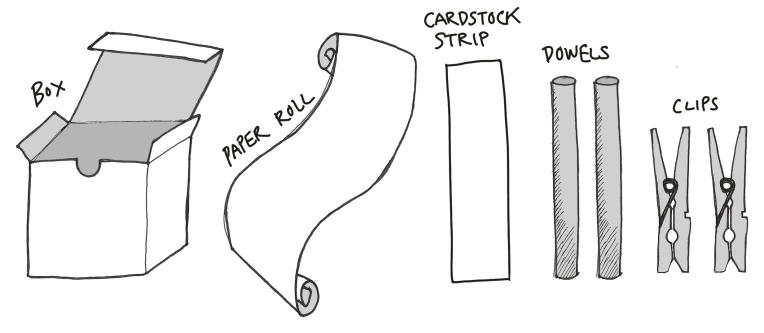
You will also need:
- scissors
- box cutter or X-acto knife
- clear tape
- push pin or skewer
Flatten box and make cut-outs:
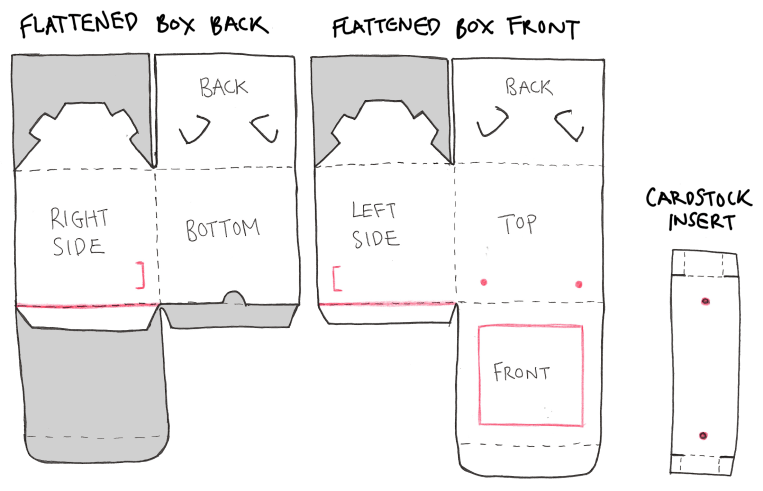
I used a square 3x3x3 gift box for this but you can adapt the design for any box (square or rectangular). Flatten your box and make cuts along the red marks noted above. The square cut-out on the “front” panel will be the crankie window. To make room for the window, the red lines along the flaps on the “right” and “left” sides need to be cut. The staple-like cuts on the “right” and “left” sides are to hold the cardstock insert (which I’ll explain later) in place. For the “top” panel, you can use a push pin to punch two holes that are roughly the size of your dowels — this is where the cranks for your crankie scroll will be.
Cut a strip of cardstock that is slightly longer than the width of your box. Cut along the solid lines and fold along the dotted lines. Punch holes into the insert that line up with the holes on the “top” panel of your box — the insert basically helps hold your dowels in place.
Illustrate your scroll:

I used a roll of 2.25″ receipt paper to make scrolls for the 3″ mini-crankie. Depending on the size of your crankie, you can just cut strips of paper that are slightly shorter than the height of your crankie box. Have fun drawing panoramic landscapes…comics…anything you can imagine! Usually a crankie scroll is loaded-in from one end and cranked in one direction — for this design, either left-to-right or right-to-left. A crankie scroll is essentially a really long illustration, but with the cranking mechanism, think about how you want your story to be paced.
Assemble all the parts together:
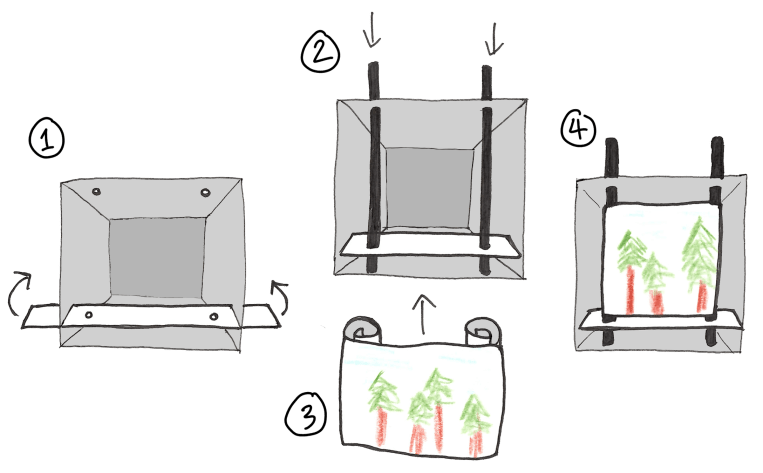
- Feed the cardstock insert through the staple-like slits in the box. Make sure the holes in the insert are lined up with those on the box. Once positioned correctly, fold and tape the ends of the insert to the side of the box.
- Push the two dowels through the box and insert holes. The dowels should be able to rotate around in place.
- With your drawing facing outwards, tape one end of the scroll to a dowel. Wrap the paper around the dowel, until you reach the other end of the scroll. Tape the end to the other dowel.
- After attaching your scroll to the dowels, the inside of your crankie window should look something like this.
Finishing touches:

Close up your box and use tape to seal any open edges. Finally, attach the wooden clips to the dowels poking out the box — these function as handles for you to move your scroll back-and-forth.
And voila! You have a crankie!

Leave a Reply